Monday, June 4, 2012

Flor de Calabaza Sopa

So what do you do with half a pound of zucchini flowers and 15 pounds of zucchini?  Panic?  Nay.  You make two loaves of zucchini bread (2 lbs.), make Flor de Calabaza Sopa (Squash Blossom Soup) and give the rest away!

We had heard of Squash Blossom Soup but had never been in a position to make it, either through the fickle nature of the ingredient or time constraints.  Jim had had a decadent dish of fried ricotta and chive stuffed squash blossoms at a posh restaurant in St. Moritz (no kidding), but had never worked with this product before.  But the zucchini plants never seem to sleep!

Looking on the Interwebs, we found many recipes for Squash Blossom Soup.  They all incorporated the "usual suspects": fat (butter or olive oil), garlic, onion, squash blossoms, chicken stock, and a dairy product yet they lacked the balance of acid and any herbs and/or spices.

We came upon this recipe and it seemed right.  Our doctoring is in italics and because we doubled the recipe, we have re-written the recipe below...


Flor de Calabaza Sopa

Serves 4
  • 3 tbsp butter
  • 1 medium white onion, finely diced
  • 6 cloves garlic, crushed
  • 6 cups / 180 g squash blossoms, cap and stamen removed, chopped
  • 2 cup chicken broth
  • 2 cup veggie broth  (we used no veggie broth but 2 more cups of chicken broth)
  • 1/2 jalapeno, minced or sweet red bell pepper, finely diced
  • 1 tsp cumin
  • salt
  • sour cream (optional) : we used the creme fraiche that we had made the day before.
  • Add-ons:
  • 1 tsp ground coriander
  • 1 tbsp lime juice
  • Chopped cilantro for garnish
  • Dollop creme fraiche for garnish
We served the soup with Brian's Bread Cracked Wheat Sourdough bread with the Zucchini bread for dessert.

With 12 pounds of zucchini left over, guess what we're having for dinner tomorrow?  Yeah , we couldn't give it all away....

Yours squashfully,
Jim and Peta

Monday, May 7, 2012

Hollandaise Redux

As the garden, work and family life keeps us super busy, we find the need to have shortcuts which are not a compromise on quality.  So we were very happy when our regular Sunday morning brunches with our great friends Monica and Chris lead to the discovery of a "cheats" Hollandaise sauce!

We don't think you will often find us quoting Better Homes and Gardens - New Cook Book - but this is a winner.  It has the right consistency, richness and tang that a good Hollandaise deserves - and it is fast.  Peta bought Jim a saucier for christmas and in this we are able to make a great sauce, without the fuss of a double boiler (just make sure you keep the heat down low and stir constantly!)

1/2 Cup butter
3 beaten egg yolks
1 tablespoon water
1 tablespoon lemon juice
dash salt
cayenne pepper

Cut butter into thirds and bring to room temp.  In the saucier or top of double boiler, combine egg yolks, water, lemon and salt.  Add a piece of the butter.  Place over low heat (saucier) or boiling water (double boiler).  Cook, stirring rapidly with a whisk, till butter melts and sauce begins to thicken.  Add the remaining butter, a piece at a time, stirring constantly till melted. Continue to cook and stir till sauce thickens, then immediatley remove from heat.  Add cayenne to taste.

We must confess that we are such Hollandaise freaks - so for the 4 of us, we double the recipe, so we can have a little left over for asparagus or some other dish!

Enjoy the quickie... especially on a Sunday!

Jim & Peta

Thursday, May 3, 2012

MasterChef!


We became enamored by the Seared Halibut with Sweet Corn Sabayon as created by Cat Cora for an episode of Master Chef, one of Gordon "You Donkey!" Ramsey's eleventy billion cooking shows.  Chef Cora is able to cook the dish in something like 18 minutes.  Yikes.  We've done it several times now, often for our occasional "special" guests, i.e. people that you can fail in front of, like family, and it always takes a lot longer than 18 minutes, but it sure is tasty.

The title of the dish is only half of the story.  Once you sauce the plate with the sabayon and plate the fish, you top the whole thing with a mixture of sauteed thinly sliced red onion, fava beans, arugula, corn and cherry tomatoes that she calls the "salad".  This is a real "composed" dish with all of the major flavors represented: sweet, salty, bitter, sour and umami.  (Note that this sabayon (or zabaglione) is savory in nature and thus does not include the sugar and sweet wine of a "normal" sabayon.)

The first time we attempted the dish, we were not happy with the consistency of the sabayon; it was just too runny.  When Peta's brother Sean-of-London visited last year, we cooked it for the second time and the results were the same with the recipe as printed until we added another egg yolks.  With the added egg yolk, the sauce seems to set up better and coat the plate without being too thick or too watery.  You can just ladle it onto the plate and give the plate a swirl and voila, a sweet and savory, mostly circular, eggy base on which to plate your fish and salad.  Super chef-y.

This time, Jim's mom was our test pilot.  We found fresh fava beans at the farmer's market at a reasonable price, but as Jim went looking for the corn and cherry tomatoes, we realized that at nowhere on the planet would sweet corn, arugula, cherry tomatoes and fava beans be in season at the same time.  Sure, this is California, but still.  While at our new favorite store New Frontiers (bulk grains!  oil-cured olives!  marrow bones!), we picked up some frozen sweet corn and utterly flavorless, "organic" Mexican cherry tomatoes while CJ's Lolo (Jim's mom) held down the fort.

We shelled the outer husks of the fava beans while watching the Daily Show and the next day gave them a quick parboil and removed the tough outer skins.  But seriously folks, here's a link to fava beans.

It's an expensive meal with the halibut (we used Alaskan rather than the local Californian because it was thicker, yeah, we know, we're evil.) but it's a keeper.

This is out first actual food picture on the blog.  They just don't look like the ones on other blogs, so that's what's been holding us back.  Clearly, we'll be looking into the lighting/angle/lens requirements of shooting food, although we have no problem with shooting food with a Remington Model 700 BDL when the opportunity presents itself.  Down goes the venison, down goes the venison!!

Jim and Peta


Thursday, April 12, 2012

Fruit + Meat = Good?

This post is about our second attempt at Tacos al Pastor which is essentially pork and pineapple on corn tortillas.  We chose to use this recipe that we found highly rated on Epicurious both times. The first time we cooked it, the flavors were great but we followed the marination schedule to the letter and wound up with very mushy meat.  Very mushy.  We knew that pineapple has an enzyme that can tenderize meat, but 4 hours is just way too long to marinate, even with 1/2 inch thick pork.  Chris and Monica were troopers for eating it at all.

So the second time, we did a bit of research and determined that the enzyme is bromelain and tenderizes meat via a process called "forking".  This enzyme is heat-labile and loses its ability to fork/tenderize meat above 65C, so fresh pineapple does it, but canned and pasteurized pineapple juice does not.  We added the marinade an hour before dinner rather then the four hours the first time we tried it and figured that we were safe.  Wrong again!  The combination of too-thinly-cut meat and the full hour produced mushy meat, albeit less mushy than the first attempt.

But the flavors keep calling us back.  The next time, we will take the advice of this blogger who recommends holding the crushed pineapple and juice back until 30 minutes until the meat hits the grill.

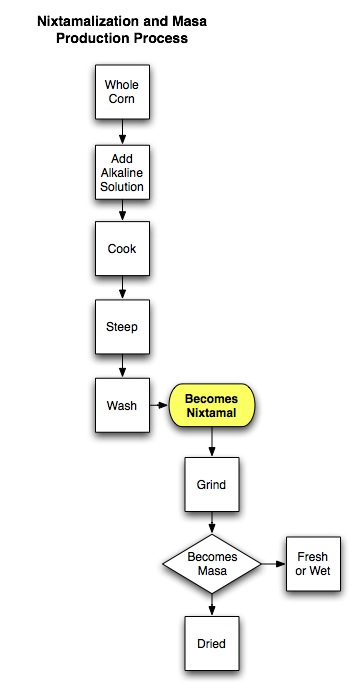
Additionally, the first time we made this dish, we didn't have a tortilla press so that process took forever.  Our guests for the first round bought us a press for a house warming gift for "the next time", so that was a big improvement.  We just added a little less than a cup of water to a cup of masa harina or nixtamalized corn flour and 1/8 tsp of baking soda.  I suppose that the baking powder is there to lighten the dough with CO2 produced through an acid-base reaction, but what's the acid?  I've seen many other recipes that do not call for a leavening agent and your thoughts on this issue are welcome.

Jim and Peta

Here's a picture of the nixtamalization and masa production process, 'cause food science is cool.


Monday, April 9, 2012

Weed Eaters

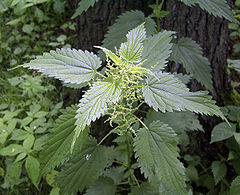
Last night, we all became a family of weed eaters, even CJ.  Before you get all, "I'm calling Child Protective Services on these terrible parents" we are talking about stinging nettles.  They are the things that you brush against while walking through tall grass and weeds -- wearing shorts.  "Ow, what the hell was that?" you might ask.  You re-trace your steps and you find this plant below and recognize it as the Stinging Nettle -- the Taser of the garden.

Now, in our garden it's pretty much a rule that most things are either killed and eaten or just killed.  Stinging nettles were in the latter camp until the other day.  We rediscovered the blog Hunter Angler Gardner Cook after learning that our friend Page had gone boar hunting with the blogger.  On it, we found a recipe for Pesto d'Urtica or Nettle Pesto and decided to try it for ourselves.

After blanching the nettles while wearing rubber kitchen gloves, Peta shocked them in ice water to stop the cooking process.  We then followed the "usual" recipe for regular basil pesto and added appropriate amounts of olive oil, garlic, black pepper and parmesan cheese into the Cuisinart but we used walnuts rather than pine nuts (since we didn't know if it would be any good, we didn't want to use the more expensive nuts). 

What??  Cuisinart and not the traditional mortar and pestle?  Sacrilege!  Yes, we know that the end product isn't the same, but we're busy people these days!  As we tasted the pesto along the way, Peta realized that the pesto would benefit from a bit of brightness so we added a bit of lemon juice.  That did it.

We added this pesto to angel hair pasta and a few sautéed shrimp and had a great laugh watching our 14 month old slurp up the capelli d'angelo.  The pasta was too thick for this sauce but that's all we have on hand, so we added so more oil olive for increased "slurpability".

Jim and Peta

Tuesday, April 3, 2012

La Noche de Tapas en Arroyo Grande

We held a tapas dinner party over the weekend and wanted to do a couple of the same recipes that we had done at a similar party we held in Marin.  Unfortunately, we came here to FoodFixers ourselves to find the recipes and realized that we had not blogged about them.  It's always a bit of a pain to re-find the exact recipe that was such a success the last time you cooked it.  So, if nothing else, we're going to use this post as a recipe repository.


We may do a different albóndigas the next time even though this one kicks so much ass.  With this recipe you end up blowing through a lot of saffron and almonds, both expensive items, and the result is not the same as that you'd get in a restaurant, which always seem to be more tomato-based.  Perhaps the next time we'll go for that flavor.  


This recipe comes from a book given to us by Peta's brother.  It's an interesting Middle Eastern cook book that is organized by ingredients.  This one we found under pistachios but the main ingredients are those right in the recipe title.  But trust us, even though it may sound weird, the flavors are great and Peta whips up a Meyer lemon aioli that really complements the dish.  

The last time we made the dish though, we had to put toothpicks in the tops of the tubes to keep the stuffing from bursting out.  However, in the interim of our move, we saw a show hosted by our man, Alton Brown.  He suggested that the squid tubes be turned inside out to allow for a sort of self closing since the outside skin tends to curl outward.  That trick worked a treat.  Also, I would recommend buying the cleaned squid tubes rather than having to do as much cleaning/dissection as Jim did.

While all of this cooking was going on, Peta managed to "whip up" a Walnut Cake.  Jim thought that it was going "a bridge too far", but it was excellent.  Just don't skim on the whipped cream since it can be a little dry.

Our guests brought a variety of excellent food, but I'll let them blog about it if they want to!

On to the next meal...

Jim and Peta
 

Thursday, March 29, 2012

Sausage Fest

No, this is not a post about a party where only dudes are in attendance.  It's about our experience making Italian sausage with venison and British bangers with pork.  Jim has made a variety of types of sausage from deer and goose (no kidding), but it was Peta's first time.  Last year's three types of sausage were a bit too much work, so we cut it down to two versatile types.

We made the sausages a month ago, but our inspiration to blog about it was a viewing of River Cottage's "Pig In A Day".   It's tough to find episodes of River Cottage online and we haven't gotten around to purchasing the series from the BBC, so we were well pleased to stumble across this video.

According to these experts, we made some mistakes along the way such as not frying off a small portion of the recipe to ensure that the seasonings are correct.   But the most amazing thing was Hugh's partner in crime's ability to tie up the sausages.  Granted, he's a butcher, but we'll do the two sausage tie-up next time rather than our twist technique (fail).  On the positive side, we did pass the meat through the large-holed plate once, added the seasoning and then passed it through again.  The Kitchen-Aid grinder attachment works a treat, but it fails as a sausage stuffer.  Additionally, there was a bit of grease from the worm-gear that we saw on some of the meat.  We didn't die from it last year, so whateryagonnado?  Also, we let the sausages hang for a few days to dry off.

For both of the recipes, we used recipes from a site called 3men.com  We half expected a real "sausage-fest" to pop up, but these guys are legit and we have re-posted the recipes here.  We did not add the MSG to the Italian links and they taste great, but the bangers were not salty enough (see above: frying off).  All of the sausages were made with natural casings.

This favorite pizza topping is a coarse pork sausage, generally sold in plump links. Italian sausage is usually flavored with garlic and fennel seed or anise seed. It comes in two styles: hot (flavored with hot, red peppers) and sweet (without the added heat). It must be well cooked before serving, and is suitable for frying, grilling or braising. The recipe below is a hybrid of hot and sweet.
  • 15 pounds boned pork butts
  • 2 ¾ cups very cold red wine (Cabernet Sauvignon works nicely)
  • 7 tablespoons kosher salt
  • 7 tablespoons fennel
  • 6 tablespoons ground black pepper
  • 1 tablespoon ground coriander
  • 3 teaspoons red pepper flakes
  • 2 teaspoons oregano
  • 1½ teaspoons garlic powder
  • 1½ teaspoons sugar
  • 1½ teaspoons caraway seed
  • 1 teaspoon MSG
Grind all of the pork butts through a one-quarter inch or three-eighths inch plate. Refrigerate the ground pork until well chilled - ideally 32 to 34 degrees Fahrenheit.
When the meat is chilled, thoroughly mix the remaining ingredients in a bowl. In a large bowl or lug, thoroughly mix the wine and spice mixture with the ground pork. Immediately stuff into 32mm to 35mm hog casings. Hang the stuffed sausage in a cool place until the casings are dry to the touch. Refrigerate or freeze immediately after drying.
If you do not have a sausage stuffer, you can store the sausage in patties or in bulk. Refrigerate or freeze as desired.

Banger Seasoning
  • 5 teaspoon ground white pepper
  • 2 1/2 teaspoon mace
  • 2 1/4 teaspoon salt [note: this should be more]
  • 2 teaspoon ground ginger
  • 2 teaspoon rubbed sage
  • 1/2 teaspoon nutmeg
Sausage
  • 2 1/2 lb. boneless lean pork shoulder or loin cut in cubes
  • 1 lb. fresh pork fat in cubes
  • 1 1/2 cup dry bread crumbs
  • 1 1/4 cup chicken broth
  • 3 1/2 teaspoon Banger seasoning
Grind pork and fat together using plate of meat grinder.
Add Banger Seasoning and mix well.
Grind again.
Stuff mixture into casings and tie in 4-5 inch lengths.
This mixture will be too fine to form into patties.

Bake or sauté as you prefer.

The first time we sautéed the bangers, the casings stuck to the pan, we didn't prick them and they exploded.  Then the second time, we poached them first, but didn't prick them, so half of them exploded.  The third time was the charm though!  Success.  We prick the bangers with a fork, poach them in simmering water for 10 minutes, remove the water, dry the pan and sauté until a nice brown color is achieved.

To complete the dish, Peta removes the bangers, adds onions and sautées them, adds a bit of olive oil if the pan is dry and adds a tablespoon of flour.  She cooks it to remove the raw flavor and to prevent lumps then adds whatever beer we have on hand to make the gravy.  Serve it with some mashed potatoes and some green vegetable.

Yours Sausagely,
Jim and Peta

Tuesday, March 13, 2012

Mmm... Folic Acid... (Part One)

Tricked you into clicking on to a post that is a paean to the humble beet!  You just got Beet-Rolled!  Ahahaha!

Well, since you're here, why don't you stay and read on?  We will try to make it worth your time; we promise.

We have been picking up bunches of rainbow chard (AKA five-colored silverbeet) at the farmer's market every Saturday for quite some time now as well as a bunch or two of beets.  You might not know it, but you can eat the beet greens (and the finely chopped stems if you braise them) instead of just throwing them into your composter or worm bin.  However, we've been eating so many greens that the beet roots were piling up.  [We'll save what we do with the greens for another day.]

But with chard at $1.50 a bunch and regular beets at $2.00, it's almost as though you get all of the sweet, earthy beet roots for $0.50.  Even if you don't like beets (or think that you don't), how could you pass up Such A Deal?  We've cooked Beets with Horseradish Cream, roasted beets with olive oil and thyme, Beet and Goat Cheese Salad, and many more, but we were getting bored with our beet root recipes.  There just have to be even more ways to cook them that won't remind you of vaguely metallic tasting, tinned, pickled beets, that you were forced to eat as a child, right?  Oh, yes.  Yes, there are.

But first, we've been making a lot of hummus these days.  Our "go to" recipe is from one of our cooking "bibles", the New Best Recipe book.  The ratios are so simple as to be easily memorizable.  Is "memorizable" a word?  Easily committed to memory?  Good enough.  It seems as though we've posted about hummus before, but we can't find the link so here it is again.  Let the memorizing begin!

Hummus -

adapted from The New Best Recipe: All-New Edition
  • 1-15 ounce can of chickpeas or equal amount of fresh cooked/defrosted chickpeas
  • 1 medium clove of garlic, minced
  • 3/4 teaspoon salt
  • pinch of cayenne pepper
  • 3 tablespoons juice from 1 large lemon
  • 1/4 cup tahini
  • 1/4 extra virgin olive oil
  • 1/4 cup water
Put everything in a food processor (or blender) and process until smooth. Chill at least 30 minutes in the refrigerator and serve with warm pita, on bread or crackers, with tortilla chips, as a spread on a sandwich, or any other way that seems enjoyable to you. 

 It takes seven minutes to make a large tub of hummus including cleaning the food processor.  Seven.

Wait, isn't this post about beets?  Yes, yes it is.  Just trying to get you curiouser and curiouser/lure you in.  We have also taken to adding a Moroccan/northern African spice mix called Ras el Hanout to the hummus recipe above.  We made up a batch and can't remember all of the ingredients, but it's one of those mixes like curry powder, "cajun seasoning", garam masala, et cetera that vary from place to place and house to house.  The "usual suspects" are all there but ratios and secret ingredients are up to the eater.  Have fun with it!  The Ras el Hanout really takes the hummus toward the "40 spices" store-bought version that Jim used to love so much, before we realized that it's 25% the cost and takes seven minutes to make.

The beets!!  What about the beets for goodness sake? Oh, right. 

Beet Hummus (Seriously) -

  • Wrap four big beets in tin foil and roast in a ~350 oven for ~45 minutes or until they are can be easily pierced with a paring knife.  
  • Let cool and peel the skins (they should really just slip off).  
  • Substitute the roasted, peeled beets for the chick peas in the recipe above.

That's it.  Sorry for the big build up.  Jim added some extra cumin and is eating it all before Peta gets any.  It's so tasty and good for you and easy and cheap.  And those are a few of our favorites things..

But you said two recipes!  Gluttons for punishment, eh?  Sorry, you'll have to go to Part II (NOTE: in progress) for that recipe since this post is quite long enough (and information-packed and entertaining).  Let's just say that we we're inspired by an episode of River Cottage and the food has five consonants in a row.  (If you haven't checked out River Cottage, it could change your life.  Seriously.)

Jim and Peta


PS: Beets really are high in folic acid though.  True story.  Also," Beetroot is a rich source of potent antioxidants and nutrients, including magnesium, sodium, potassium and vitamin C, and betaine, which is important forcardiovascular health. It functions by acting with other nutrients to reduce the concentration of homocysteine, a homologue of the naturally occurring amino acid cysteine, which can be harmful to blood vessels and thus contribute to the development of heart diseasestroke, and peripheral vascular disease. Betaine functions in conjunction with S-adenosylmethioninefolic acid, and vitamins B6 and B12 to carry out this function." (from Wiki)

Disclaimer: If you haven't been a beet-eater and decide to make any beet recipes included herein, please remember that you had beets when you visit your "facilities" rather than freaking out and going to the ER and then blaming us for the bill.  Thanks!

Wednesday, February 29, 2012

Poor Man's Sous-Vide

We asked our friend and fellow food and farming explorer, Matt Rothe, to write a guest post for our blog.  Sometimes, it's just nice to have the articles come to you!

Poor Man's Sous-Vide
I don’t actively follow food trends, but by the nature of my work (Sustainable Food Program Manager), the industry in which I’m employed (university foodservice) and the people with whom I frequently interact (chefs), I tend to stay abreast of what’s new and hip in the culinary world.  Lately it seems I’ve heard much about a style of cooking called sous-vide, which is French for “under vacuum”.

In simple terms, sous-vide cooking involves sealing food in a plastic bag, depositing the bag and its contents in a relatively low temperature water bath, and cooking it for a designated period of time at a constant temperature.  One of the primary benefits of this type of cooking is that food can be cooked perfectly evenly and to an exact “doneness”—two elusive attributes in cooking most types of meat.
One could argue that attaining an evenly cooked hamburger is not a gastronomic problem in need of a solution.  After all, humans have been ravenously consuming meat cooked over direct heat and varying degrees of doneness for millennia.  But by this logic, I can’t imagine that we’d have ever invented plumbing, made art, or built solid-state devices that put the entire accumulated knowledge of mankind in one’s hand.

To satisfy my intellectual curiosity, I turned to my own handheld solid-state device for some instruction.  I found some mostly useful and consistent information about the technique, but I was aghast at the retail price of the equipment.  Moreover, sous-vide equipment is not a commodity in the markets for used goods: Craigslist turned up zilch and the clerk at my local Goodwill said everything with an apologetic shrug.  Over a day of intermittent and mindless rumination, however, Occam finally wielded his razor.

It turns out that successfully cooking sous-vide requires equipment and miscellany that most people, including myself, already have or keep inventory of in their kitchen:  a stove, a stock pot, a re-sealable plastic bag, a thermometer, a timer, and a little time to correlate one’s stovetop settings to sustained cooking temperatures.  In this experiment, I don’t know if I was prouder of the resulting hamburgers or that I thwarted the Jedi mind tricks of the consumer electronic industry.

In a bowl, I combined:
  • 1 pound of grass-fed ground beef with
  • 1 heaping tablespoon of salt
  • 1 teaspoon of ground pepper
  • 1 packed half-cup of finely chopped fresh sage, rosemary and thyme (I prefer garlic chives to thyme but mine were crowded out by my wormwood)
I like to form 1/6 pound sliders, in part because they afford healthy portions, but also because the small brioche buns I like to put them on come 6 to a bag and I never end up with a random unused bun that has no culinary value beyond the delivery of a hamburger.

I placed the sliders in a one gallon Zip-Lock bag, sucked the air out by using the protective tube for my thermometer, and placed them in an 8 quart stock pot filled to about half with water.  I imagine every stove’s settings are unique, but to sustain a temperature of 130 degrees Fahrenheit, which will result in a perfectly medium-rare hamburger, requires a rather low setting (2 of 8 on the small burner for my stove).  I cooked the burgers for about an hour after the water returned to the desired temperature.

One negative attribute of cooking sous-vide is that you never reach temperatures that invoke the   Maillard reaction, which in the opinion of food scientists (and confirmed by those who eat), is half the sensory appeal to cooked food, including meat.  With that shortcoming in mind, I brought a cast iron skillet with a few tablespoons of canola oil to a medium-high temperature and, after removing and lightly drying the sliders with a paper towel, fried them for about a minute per side, giving them a slight brown color and the characteristic smell of cooked beef.

I served the sliders on a toasted brioche bun with a thin slice of soft goat cheese.  Primacy bias aside, I dare say they were the best hamburgers I’ve ever eaten.  At two hours in the making they were not, however, the fastest hamburgers I’ve ever made.  On the net, I’d conclude that cooking sous-vide is a worthy pursuit for any serious cook or foodie who’s interested in exploring the margins of flavor and learning new techniques in their free time.  It need not be, whatever one’s interest or means, an expensive affair.

About the author: Matt was raised on a large conventional corn farm on the plains of Colorado. After graduating from Dartmouth College with a degree in Environmental Earth Science, he took a position with Niman Ranch (in the Bill Niman days) as their Director of Operations. While there, Matt played an instrumental role in growing its network of sustainable family farmers and gained an acute appreciation for the challenges and opportunities of today’s food system. Matt left Niman Ranch to pursue an MBA at Stanford, during which time he co-founded the Climate Conservancy with the owner of this blog, Jim Sweeney, and their mutual friend, Steve Davis.  To support his habit of saving the world, Matt worked briefly as the Director of Operations & Sustainability with the venture-backed functional food start-up Attune Foods.  After the markets crashed and the dream of labeling consumer products with their carbon footprint drifted away, Matt retuned to Stanford to pursue his other passion, real food, by directing the Sustainable Food Program for Stanford Dining.  Matt has spent his entire life working within the food system and he has accumulated first-hand experiences that span from the knock box to the corporate boardroom.  Taken together, it’s all made for some interesting observations and insights about our food, which he shares on this blog and through guest lectures and other speaking engagements.

Friday, February 17, 2012

Chicken Scratch

We'd like to talk a bit about eggs.  We had some guests coming over last weekend (Chris and Monica, Sara (Chris' sister) and Jeff and their daughter Roxy) and we decided to do Eggs Blackstone.  We are all getting more and more heavily into local, organic and homemade food so Jim took a ride to the Zen Hen Hut on the Mesa in Arroyo Grande (AG).  That hill is a killer.  Without the gearing on the touring bike, he never would have made it.  He claims that he's "going over the grade" to Pozo to check out the Nick Ranch which provides the grass-fed beef to Grande Markets in AG.  Peta suspects that he wants her to come pick him up at the Pozo Saloon where they can enjoy a beer and a burger.  She may be on to something there.

Long story short (too late), Jim met the egg lady, Peri, who was chopping up slightly over-ripe tomatoes and bananas(?) for her 37 girls and one banty cock.  Yeah, I could have said rooster.  Jim talked to her for too long and then bought two dozen eggs.  At $4/doz, they aren't cheap, but pastured eggs have been shown to have  

• 1⁄3 less cholesterol 
• 1⁄4 less saturated fat
• 2⁄3 more vitamin A
• 2 times more omega-3 fatty acids 
• 3 times more vitamin E
• 7 times more beta carotene and 
4-6 times more vitamin D

 That's good news especially if you have cholesterol issues but love eggs.  However, Jim had an ulterior motive in addition to merely purchasing the eggs.  He and Peta purchased a chicken coop off of Craigslist the week before and were going to get some laying hens (Asutralian: chooks) over the weekend and he wanted to check out her operation.  He got some pointers, but crazy things have happened since the birds arrived.  We were supposed to get three 4 month old chickens, but one died before we picked it up, so another Craigslist guy gave us a 6 month old for the same price ($12).  We got them home in cardboard boxes in the Mini Cooper along with supplies from the hardware store.  We put them in the coop and Une (we know that 'poulet' is maculine, but this chook is a Sheila!  Crikie!) a Black sex link started really whaling on Trois, another fellow Black sex-link and giving Deux, a Delaware, a few nasty pecks in between.  Not knowing what to do other than debeak them and not knowing how to do that or separate them, Jim got Une out of the coop/tractor and put her into the yard.  She walked around contentedly until Jim heard a hawk and then spied three of them circling.  So he put some temporary chicken-wire around the coop so that she'd be contained in an emergency and everything seemed hunky dory.  She got out a few times be would always return to the safety of the temporary enclosure.

It was only when the night began to fall and we'd had an adult beverage that she refused to go back in to the temporary pen.  Have you see the Rocky films?  Can you hear Burgess Meredith as Rocky's trainer Mick as he exhorts the Italian Stallion to catch the chickens?  "They're like greased lightening, Rocky!"  That was us, except for the boxing angle and that our new neighbors laughing at us.  Finally, we got her into the temporary enclosure and it was time to put her into the run for safety, but not the coop/roost so that she wouldn't kill the little gals.

Jim began to decrease the size of the enclosure and that's when it happened.  The wire formed a ramp up to the roof of the roost and she scrambled/flapped up it to the peak to gain height (and domination on Jim).  Now, you might be thinking, "Hey city-boy/girl, dontcha know that chickens can fly?"  Yes.  Yes we do.  They can fly and not too badly.  Well, better than emus anyway.  But we thought that the wings had been clipped although we hadn't actually researched what a clipped wing actually looks like.

So she's up on the roof about eye-level with Jim and he makes a grab for her.  "Up, up and away.  On my beautiful balloon..."  Over the fence she goes to the neighbors that we have not yet met.  Sweet.  Jim has heard that the lady next-door is super fussy about her flowers so he goes next door and leaves a note hoping that they won't call the cops because chicken might not even be legal.  The next day, neighbor Steve knocks on the door for our first meeting.  He invites Jim over and they spend the intervals when CJ is asleep chasing Une around his yard with bedsheets, food enticements and finally the whole roll of chicken wire.  Then it starts raining.  Then she hides under the thorny blackberry bushes.  Jim said to Steve, "Ah, the heck with this" while in his mind he was thinking, "Fuck off, chicken.  Next time you see me I'll have my pellet gun."

Two hours later as it's getting to dark, Steve informs us that Une has climbed up an apricot tree and flown back into our yard.  Hooray!   She's still loose, but to make a really long story slightly shorter, she was near the coop so Jim just opened the door and walked around the coop until she went in.  Case closed.  No eggs yet, but no bird deaths either.  We'll be clipping her primary flight wings (propulsion) this weekend but leaving the secondary wings (lift). 

They are eating a ton of weeds and CJ loves them.  Once the eggs start flowing we'll let you know how it goes.

Jim & Peta

PS: if nothing else, we now have a much better understanding of the sayings: pecking order, hen-pecked, she rules the roost, flew the coop and chickens coming home to roost.

Monday, February 6, 2012

One wingie-dingie... two wingie-dingie

So the Patriots came up short against the Giants again.  Bummer.  So let's talk Superbowl food instead.  We went over to Chris and Monica's house for the game and we over-catered, as usual. 

There were:
  • Hummus and Crudites
  • Cal-Poly Smoked Gouda
  • Parmesan and Dried Apricots
  • Mushrooms on Toast
  • Asian Wings
  • Hot Wings
  • Caesar Salad
  • Lamb Meatballs with Pine Nuts and Pomegranate Molasses Glaze

We can't speak for anything but the Hot Wings and the Caesar Salad about which we have posted previously.  Oh wait, no we haven't.  Here's the recipe that Peta used from the Reluctant Gourmet.  Jim cannot vouch for its quality since he couldn't focus on anything but the wings and the game.  However, the other party-goers were happy with the flavor and we'll probably use that recipe again.

As for the Hot Wings, Jim used this recipe to satisfy his desire for those wings that come out of the kitchen that blow apart your sinuses.  Unfortunately, this recipe was not that one.  Here are the ingredients:
  • 4 to 5 pounds chicken wings
  • Freshly ground black pepper
  • Salt (if desired)
  • 4 cups vegetable oil
  • 4 Tablespoons butter (1/2 stick)
  • 5 Tablespoons Louisiana-brand hot sauce or Tabasco sauce
  • 1 Tablespoon white wine vinegar 
Jim did take heed of a comment on the page to coat the wings in butter first and then add the hot sauce and vinegar.  It made sense and this technique did indeed create a crispy wing.  However, the wings were not nearly hot enough and the bleu cheese dressing was not even needed to cool things down.  [At this point, Jim doesn't follow a recipe for the dressing anymore.  He added varying amounts of mayonnaise, crème fraîche (one part buttermilk to seven parts cream, shake well, leave on the counter covered with a paper towel then refrigerate), Worcestershire sauce, lemon juice, black pepper and crumbled bleu cheese and checked with Peta to make sure that it was good enough.]

The fault of the lack of heat was probably using a store brand "Louisiana" hot sauce without even checking the heat level.  Just inexcusable laziness.  Adding cayenne and a bit more vinegar for the added tang could have done the trick.  Maybe?  We'll find out next season...

Jim & Peta